 |
| This is NOOB cat. Which is an actual thing on the internet. True story. |
Don't worry: If I can figure it out, so can you!
Here are some quick notes for the basics of rendering an image sequence and turning it into a nice tidy movie file. This assumes that you have a maya file with some stuff that you want to look better than just your standard playblast.Before we start: you have textures right?
This is content for another class, and I won't go over it here. I'll assume you have that sorted and ready to go.You have lights as well?
 |
| Don't worry, those arrows won't hurt the Live Ball. |
To make a simple 3 point lighting setup, I added three directional lights: Key (100%) Fill or bounce (30%) and Rim light (10%)
They're simple white lights, no fancy settings. Just enough to show my scene and textures.
Step one: Render settings window

First the common tab settings:
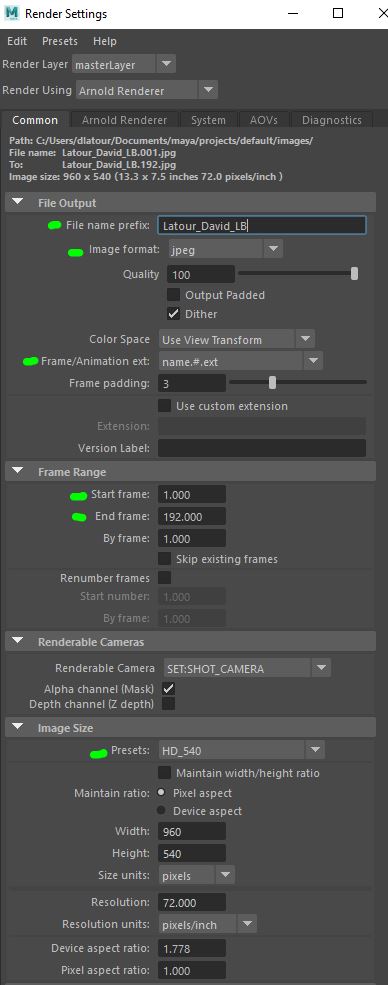
I've marked with green the things I changed from their default settings.
Filename follows my usual format
This will make sure your images sort in order when you load them into Premiere later
This is the full range of the animation. Test your settings first by rendering just 10 frames of the animation to start.
Make sure you're looking through the right camera
For your final semester 2 project, you'll want full HD resolution. HD_540 will work for your basic animation assignment.

In the Arnold tab, I'll just turn on Motion Blur and adjust one setting to make sure the effect is subtle.
PRO-TIP: watermark ruining your day? Make sure that you don't have "ignore license check, use watermark" turned on
Lowering the length will reduce the range that the blur covers. On fast movement, this keeps the character silhouette closer to what I'm used to seeing.
Step Two: open up the render view and check your results

Before you commit to rendering the entire sequence, click on the render view button in the upper right of Maya
In the render view window, you can click the "Render current frame" button to test the current frame and "Render sequence" to render the entire range you set in the common tab of the "Render Settings" window
PRO TIP - if you have a dropped or bad frame, you can always use the "Render current frame" to redo the problem image and then "file>save image" to put it into your sequence.
PRO TIP - if you have a dropped or bad frame, you can always use the "Render current frame" to redo the problem image and then "file>save image" to put it into your sequence.
Step Three: Let's turn that sequence into a movie file!
There are many tools to turn an image sequence into a movie file. QuickTime Pro is a handy choice for mac users. I'll use Premiere in this example.

- Launch Premiere,
- click "File>Import" (or just hit Ctrl+I)
- when the browser window comes up, I'll click on the first image
- check the box near the bottom that says "Image sequence"

- RMB click on the sequence
- from the menu select "Modify"
- then select "Interpret footage"
- in the popup - change to 24fps
Once I'm satisfied that everything looks good, I'll use "File>Export" and output my work as an H.264 MPEG4. I'll stick with the same resolution as my source files to keep things looking nice.
Here's what I was able to produce:
Problems? Let's troubleshoot it in next class or come see me during office hours.